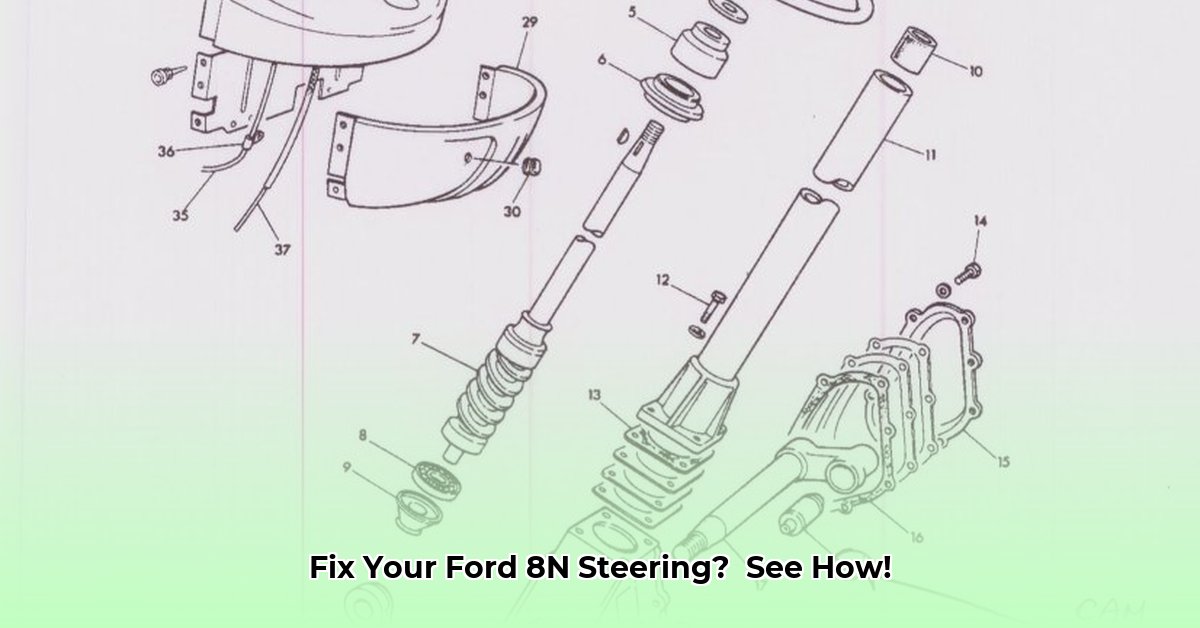
Restoring your Ford 8N tractor's steering box can be challenging, but this comprehensive guide, coupled with a detailed diagram (not provided here, but essential), will help you navigate the process. We'll cover disassembly, inspection, cleaning, reassembly, testing, and troubleshooting. This guide assumes a basic understanding of mechanical repair; if you're unfamiliar, seek assistance from an experienced mechanic. For additional specifications, check out the Ford 8N specs.
Tools and Materials: Getting Started
Before you begin, gather these essential tools and parts. A high-quality Ford 8N steering box diagram will help determine which replacement parts you need.
- Tools: Socket set (metric and SAE), wrenches (various sizes), screwdrivers (Phillips and flathead), gear puller, bearing press (highly recommended), cleaning solvent (brake cleaner or equivalent), shop rags, grease gun and appropriate grease for steering gearbox components.
- Parts: Replacement parts (sector shaft, ball nut, bearings, seals, gaskets, etc.) – source these from a reputable supplier. Original Equipment Manufacturer (OEM) parts are usually preferred for the best fit and performance. Aftermarket parts can be used, but quality varies. Your diagram will guide your parts selection. Always cross-reference part numbers with your diagram and a trusted parts catalog.
Disassembly: A Step-by-Step Approach
Safety first! Secure the tractor before starting any work. Take detailed photos at each step to aid reassembly.
- Disconnect linkage: Disconnect the steering linkage rods from the steering box.
- Remove gearbox: Carefully remove the bolts securing the steering box to the tractor's frame. Gently remove the gearbox.
- Systematic disassembly: Following your diagram, meticulously disassemble the gearbox. Note the location and orientation of each component. Photograph each step.
Inspection and Part Assessment: A Critical Evaluation
Carefully inspect each disassembled component for wear and tear:
- Gears: Look for wear, pitting, or damage to gear teeth.
- Seals: Inspect seals and gaskets for cracks or tears.
- Shafts: Check input and output shafts for bends or damage.
- Housing: Examine the housing for cracks or substantial wear.
Cleaning and Preparation: Preparing for Reassembly
Thoroughly clean all parts using a suitable solvent and brush. Remove all grease, dirt, and grime. Allow parts to dry completely. Inspect again for any damage missed during the initial inspection.
Reassembly: Precision is Key
Reassembly is the reverse of disassembly, but precision is crucial. Your diagram is your guide!
- Lubricate: Lubricate new parts before installation.
- Gear meshing: Align gears precisely according to your diagram. Incorrect alignment causes binding and steering problems.
- Seals & gaskets: Install seals and gaskets carefully to prevent leaks.
- Component placement: Install components in the reverse order of disassembly, checking their placement against your diagram repeatedly.
- Secure: Tighten all bolts and fasteners securely.
Testing and Adjustment: Fine-Tuning the System
- Reinstall: Reinstall the steering box in the tractor and reconnect the linkage.
- Test: Test the steering slowly, checking for smoothness and responsiveness. Note any play or stiffness.
- Adjust: Make necessary adjustments as needed. Consult your service manual for precise adjustment procedures. Minor adjustments can significantly impact steering performance.
Troubleshooting: Addressing Common Issues
- Stiff steering: Check gear meshing, lubrication, and bent components.
- Loose steering: Inspect for worn gears or other damaged parts. Replace as needed.
- Non-functional steering: Verify all connections and component placement. Recheck your diagram.
Remember, a well-functioning steering system is crucial for safe tractor operation. Take your time, follow the steps carefully, and consult your Ford 8N steering box diagram at each stage. If you encounter any significant difficulties, seek help from an experienced mechanic.